New Shelves In The Pantry

0 comments
Hi Friends,
What did you do this weekend? 
Did you watch the Super Bowl or just enjoy Super Bowl food?
I just care about the food not the game. 

I worked on a little project.
Our neighborhood was built for families. 
The houses are 4 and 5 bedrooms but
some of the storage in my house was not designed for a family with three kids. 
I realized the day after we moved in 
that the pantry shelves were not spaced far enough apart to stand up a large box of cereal. 
?


We had to turn the boxes on the side.


Well, you would think that our first DIY would be to rebuild the pantry. 
Nope.
It wasn't high on the priority list nor could we agree on the type of shelving. I wanted wood, he leaned toward an Elfa system.  
20 years later and we still had not resolved the cereal box dilemma until last night. 


We finally put our heads together to try to figure out a solution to the pantry problem. 
We went to Lowes. 
We decided to get old fashioned support rails and brackets to build narrow shelves on one of the side walls. Our pantry is not symmetrical. 
The left side has more depth than the right. (I never noticed before.)


We got Blue Hawk brand rails and brackets. They were $9.98 and $7.98 respectively. We only needed two rails. We got 8 brackets.


This is exciting!


Why? Why would we live with an inconvenience like this?


You know I had cereal all over the floor more than once in 20 years. 


The whole pantry got a sprucing up. 


I threw away the expired food. 


We had vinegar from who knows when. 


I found the chalkboard labels out at First Monday Trade Days. I spray painted the lids of my canisters red to match the gingham shelf lining. Just be sure to prime before you paint. Rust-o-leum in Regal Red is the color I chose.


I'm smitten with my baking shelf. 


I picked up the rolling pin at an antique store. 
I love, love the red handles. 


I return some duplicate wedding gifts and picked up the chicken canister 30 years ago. I had the whole set but this is the only one that survived. 
I think because it was holding cotton balls in an upstairs bathroom. 
The top needed a new coat of spray paint but now it's as good as new. These were all the rage in 1983.
I actually wouldn't mind hunting down the rest of the set. 


I replaced the shoe rack that I took out of here for the lower cabinet project.
It's perfect for holding soda, pop or cokes, depending on what part of the country you are from. 
Texans call everything coke. 
New Yorkers call it soda and my friends in Indiana call it pop. 
The shoe rack also holds coolers and lunch boxes.


We will leave the other side free of shelves so we can have some space to hang a few things. 


For some reason the door to the pantry is almost always open during the day. 


I wish it always looked like this. 


Sometimes it is the little things... 
Katie
   
Linking with,
Between Naps on the Porch 
Coastal Charm
A Stroll Thru Life
My Uncommon Slice of Suburbia
Savvy Southern Style
French Country Cottage


Goodbye Black Walls

0 comments
It was cutting edge and daring at the time.
We were so chic and totally out there for painting walls black.


 Only teenage Goth children had black walls.


Rebekah and I loved these walls but it's time for a change.


They've got to go.
I used to love, love dark, moody wall colors.


Not anymore. 

  
 I think I'm going to go with white. 
I think the white vanity and wood counter top will look good against a bright backdrop.


I also want to frame out this mirror and put up some wainscot since I know how to do that now. 
  I would have done this room already but our house has been a revolving door of our adult children needing to stay with us.


I want them to feel that this is their home even if we have stuff everywhere and we are tripping over each other. 
My oldest is about to embark on a major change.
He will be leaving for N.Y. soon.
My Texan son, born and raised will go live in the state where I was born and raised.
My brother just moved his middle child to New York, as well.
Crazy. 
I'll keep you posted on the bathroom and on my son. 
Have a great day. 
Katie


Water Marks on Fabric

0 comments
There was a stain on our new sofa.
It looked like a little spill of some kind and it was only about the size of a quarter.


It was bugging me so I got a wet rag and started working on it. 
Big mistake!
The spot that was about the size of a quarter left a water ring about the size of a grapefruit.
So I googled what to do. I was pretty skeptical that anything would work.
  The search said to dampen the stain.
At this point I risked my grapefruit size stain turning into a pumpkin size stain.


But I followed the intructions and wet the area around the water ring.
I covered the wet area with a white cotton cloth and ran the iron over the stain with it set on low.
I used a pillow case. 


It took a while for the iron to dry the water but it did. 
When I lifted the cloth the water marks were gone. 
I still have a faint outline of the original stain but it looks so much better with out the huge water mark. 


I'm a little disappointed that this fabric isn't a little more wash and wear. It looks like it should be.


I was afraid that it wouldn't work and I would have an even bigger water ring and that the iron would melt the fiber in the cushion of the couch. 
Neither of these happened and the Google search proved a success.


I am sort of a cushion hoarder. 
(I'm a pillow hoarder too, but that is another post.)
;)
I never want something on one side of the cushions so I can't flip them. Does this make sense to you? 
I have two perfectly good sides to the cushions and I want it to stay that way.


We scrimped and saved to buy our first couch; a country blue camel back number. 
It was divine until the baby sitter left my toddler alone in the living room with the chocolate ice cream so she could talk on the phone with her boyfriend. 
Oh my word! It was a disaster!
Chocolate was smeared from one end of the cushion to the other. That couch got water rings too, if I recall. 


Crisis averted with this couch and I still have two perfectly good sides for flipping freedom. 
Have a blessed day. 
Katie

Friends In Low Places

0 comments
I was so frustrated with our lower cabinets.


There was a flaw in the roll out shelf system and a few years after we bought the house, the supports started to break. 
One by one they broke and one by one I wired them back together.


It was not a perfect solution by any means but I didn't know what else to do.
The wheels have recently begun to stick so there is drag and squeaking every time I try to get something out. 
One of the most frustrating areas was the cabinet with the pots and pans. 
No matter how I tried to stack them, nest them, with lids, without lids, it was always a jumble.
It was dark in there.
I could never see what was in the back corner. 


This cabinet was not my friend. 
The other family members who help with dishwasher unloading were also frustrated with our situation.
I picked up a little shelf like thing while I was out one day and utilized it in my platter cabinet. 
I loved it so much that I thought the same type of thing could work for the pots and pans.
I realized there was freedom in getting rid of the pull out shelves. 
I bravely took them out, unscrewed the supports and put them in the trash pile. 
We are never, ever going back to that system.
I had no intention of getting out today so I started looking around the house for a solution to this cabinet's organization. 


I saw a shoe rack that I used for lunch boxes and drinks in the pantry. 
Perfect. 
It is white like the outside of the cabinets so it will brighten up the inside and it will provide two levels of storage.
The pots fit perfectly on the shelves.


 I am thrilled.
So is my son. 
He said, "It's about time."


Almost all of the same things are back in the cabinet as in the before picture. 
The only thing I got rid of were stray storage container lids.
 Amazing!
 I love how organized it all is.


It's so much brighter in there.


I'm so glad this cabinet and I are finally friends. 
Next up? The mixing bowls and bakeware…
Katie   

Linking with,
City Farmhouse   
A Bowl Full of Lemons

Winter Preschool Art

0 comments
We've had a busy month at school.
We reused our Owl bulletin board and put cotton ball "snow" and snowflakes on it.
The kids made the snowflakes the first day back from Christmas break. 
It was an easy and low key way to ease back into a busy day. 


In the spring we will have the kids make some cherry blossoms. 


We had the kids build these cute snowmen. 
It reinforces small, medium, large, on top of, and shapes.
We did have to remind them to have their circles touching but that was about it. 
Didn't they do a great job?
Older children could cut out their own circles but we did all the cutting. 


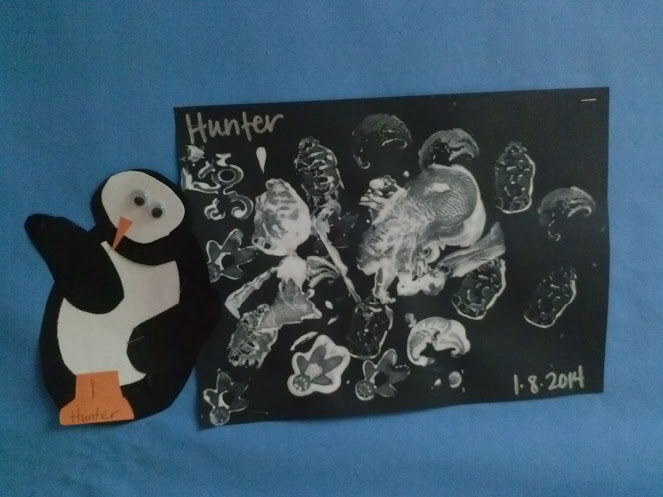
We also did an Arctic/Antarctic animal study and made these penguins. 


I love how each one has their own personality. 
I'm not high maintenance about where they put stuff. As long as it looks like what it is supposed to be we allow them to do it themselves. That's what makes it cute to me. Otherwise than the teacher is making all the art. 
That is a no-no in my book.

We hung them next to the blizzard they made with stamps and white paint. 

Two years ago one of the kids busted out singing when we made these; "We're going to a penguin party." 
Soon they were all singing it. It was adorable.
His penguin actually looked like it was dancing. 
  
We got the idea for these snow globes off of Pinterest.


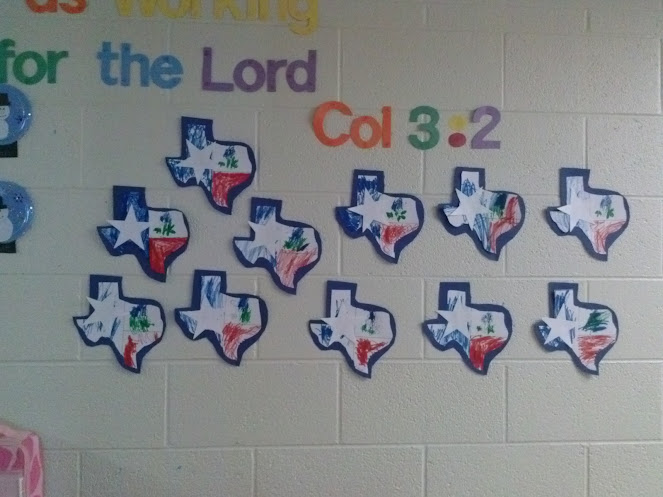
We are ending the month with our Texas and Cowboy/Cowgirl units.
We made these state shaped flags last week.


We take the opportunity during Art/Craft time to reinforce fine motor skills. 
We also review concepts learned one on one or in smaller groups. 

Our walls are full for the time being.
Soon we'll take all this down and start Valentine's Day stuff.
Thanks for coming by.
Katie  
 
Copyright © Moviehole-katietreasures Blogger Theme by BloggerThemes & newwpthemes Sponsored by Internet Entrepreneur