I told you last week that I had something up my sleeve for the kitchen. My kitchen had a very 90s look.

It had dated oak cabinets but it also had all that open space above the cabinets.
It was better than the soffits in 70s kitchens but still...
Painting the cabinets helped but the linear look remained.
I added this little cabinet before we painted to break up the line around the room.

It was originally supposed to go above the microwave but it didn't look good.

As I was writing my blog post celebrating the anniversary of my white cabinets I couldn't dislodge an idea that I had a year ago.
I went back to the internet to get some inspiration and to get just the push I needed to get going.
I was a little afraid it would look bad.
I love DIYing when Bill is out of town and last Saturday he was up at my brother's ranch taking the cows to get branded.
I figured it was a good opportunity to putter in the garage.
I had hoped he had all the supplies but I couldn't find what I needed so I asked Bill to help me with this easy and inexpensive update.
I told him what I was thinking and I showed him some pins on Pinterest for inspiration.

He seemed excited to head to Home Depot and get started.

He seemed excited to head to Home Depot and get started.
I can tell when he is fired up about one of my ideas. He charges ahead and takes over. We had this thing done in 2 1/2 hours and that included a lunch break.

I wanted a vent hood look but we didn't need a vent hood.
Instead I had him build a box as if there were a vent we needed to hide.
We designed a three sided box.

It consists of 2-1 x 12s for the sides. The front is a piece of 1/2 inch plywood.

We put each piece up on the cabinet and then used the air gun to tack them together.

We covered the box with pre-primed bead board to match the island.

He trimmed it out with dentil crown molding and trim. The most challenging part was the mitered corners.
There were some other molding options if you feel you can't do crown. I primed the crown molding and then painted the rest with some oil based semi-gloss.
Our paint color for our cabinets is Dover White by Sherwin Williams.


I'm loving it!
I have had the little antique shelf for about 3 years. I knew I wanted it in the kitchen somewhere but didn't know where until we finished the "vent hood."

I like it with the tole painted tray.
I also went to the thrift store and picked up two more silver trays so both sides would be symmetrical.
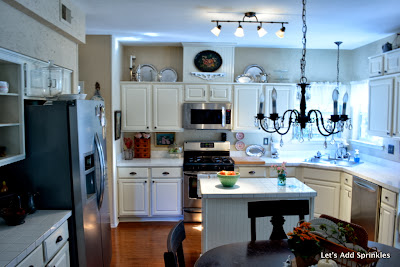
I love the look of the silver and the crystal together.

The box is very light weight. I didn't want to add an additional weight load to the top of the cabinets. It was easy and it cost less than $75.00 for supplies. The crown molding was the most expensive part.
There is a plug in the microwave cabinet so we added some lights on the top.

Some of you observant friends may have seen a sneak peak of it in my Halloween tree post.

I think a wreath at wreath at Christmas will look fabulous.

I am so thankful for a handy husband.
Katie
Linking with,
Between Naps on the Porch
My Uncommon Slice of Suburbia
White Lace Cottage
Savvy Southern Style
Feathered Nest Friday
Common Ground
A Stroll Thru Life
Funky Junk Interiors
0 comments:
Post a Comment